Building Translations with GlyphViewer
GlyphViewer application allows the user to create translations from text in images so that you can internationalize your content in images. You may use them in the HTML format to add them to your site, or publish them at 2glyph.com and use the direct link.
At the moment GlyphViewer supports many modern languages and some ancient one. In this article I will guide you through the steps of building translations from text in image from a modern language.
Let’s suppose we want to add the following image to your website. What you want is to allow non-German speaking to actually understand the content. As said GlyphViewer is not just about creating translation’s, it’s about creating quality translations that you want your users to check out. You may as well add your own content for each specific language, that said, cultural expressions that people who speak a different language can relate and understand. So let’s take the following image:
1. Add the image in GlyphViewer
First of all you will have to open the original image in the application. Create a project and add your image to the project from Project->Add Image menu.

2. Recognize the text
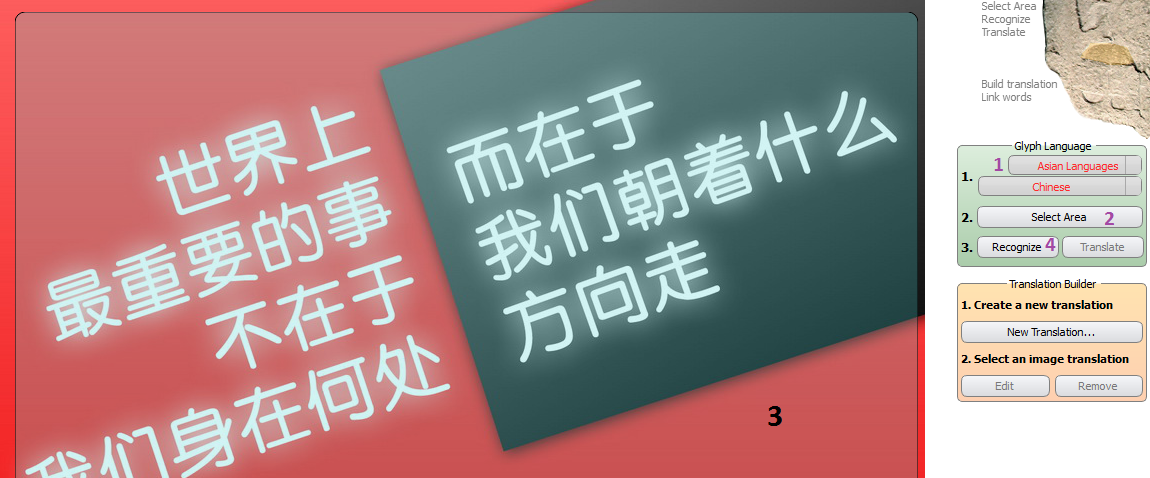
The next thing you will need to do is to actually get the text from the image in order to use the stream of characters to paste into an online translator, or even send them to your Chinese friend. Of course you could enter them manually by using the New Translation button, but this would mean that you can actually read and understand the language, and have a keyboard layout set for it. The easiest thing to do right now is to use GlyphViewer’s OCR technology to get the text. But you should be aware that any OCR technology is not 100% accurate so you should always proofread the result. All you need to do now is to select the correct language(1.), click Select Area (2.) and drag a select area across the text (3.) then click on Recognize (4.), as you can see below:
3. Build translation
You will notice that the OCR engine will create a new translation shown on the image that you can move around and edit. This by default is a translation element that currently has only one translation, in our case Chinese text. What we want is to add more languages to it, such as English, as shown below:
 Notice the Language combo box that appears when you hover over the translation. You may use it to switch between different translation that you have made, so that you may see them in real life how they look over the image. Also please keep in mind that each translation can have a different font an color, so you might want to change them for different languages.
You can also move the translation element across the screen to position it in a right place, for example a place in a image that has nothing interesting.
Also you can build as many translations as you like in an image, if you purchased GlyphViewer application.
Now when you are ready to add a new translation, you will notice that when you click on the translation element, the Edit button in Translation Builder becomes enabled. As well as Remove if you’d like to delete it.
Clicking on Edit will open a new dialog that you will use to create your translations:
 The Translation Builder dialog is designed for creating translations from Ancient Languages. But it might be very easily be used for modern languages as well. All you need to do is to choose a translation language to create (1.), choose the desired font and color (2.) then actually write the translation in the text edit box (3.). If you intend to write a translation in a non-Latin language, such as Arabic, you should first choose a correct keyboard before starting to write in the text box, as you would do in notepad for example.
That’s it, very simple. And you can create as many translation per a translation element as you like, as long as they are in the Translated To: combo-box. Also you can assign different languages to different translation elements in the image. When you will publish them if the selected language does not exists in what the user will select, nothing will be shown, but read further to see what I’m talking about.
4. Publish your content
You are done creating translation (hopefully you saved your project by now) now it’s time to let your users check your work. GlyphViewer allows you to get a snapshot of the image with the current active translations, by clicking on Export As Image… menu. But the thing that you will be interested in is to actually export the image in a HTML format so that a user can select the translation he wants in order to understand the text. This is done from Export As HTML… menu:
 The Default Language allows you to choose which translations will be shown by default when the HTML is loaded.
You will notice on the right upper side of the generated HTML that there is a select combo box that the user can choose to show which translation he wants to,
Destination text box will be the path to your generated HTML document.
Clicking on Export button will create this file and also open the newly created HTML document in the tab bar.
You may use the HTML document to publish it at 2Glyph.com , using Publish HTML… menu (it will become enabled once you selected the HTML document in the tab bar), or to manually add the data to your site. All you need to do is replace the file:/// entries from the HTML file to your server’s URL. Eg: Replace tag
<IMG src=”file:///C:/GlyphViewer/projects/Images/direction.jpg” width=”1209″ height=”680″ useMap=”#features”> with
<IMG src=”www.your_site_url/direction.jpg” width=”1209″ height=”680″ useMap=”#features”> where the image is accessible on that address.
When you Publish to 2Glyph.com , we do the same fix-up of the loaded Translation Map or HTML document. You can check out a sample of this translation here: https://www.2glyph.com/pub?ID=340ab1b7c9035727cda504d8e0a77287cb1dde9c
Have fun using GlyphViewer and remember we always appreciate any feedback!