GlyphViewer – Building Translations
Glypher Data
GlyphViewer application enables a user to create translations from text in images, text available in different type of languages:
- Modern languages that can be easily recognized by the OCR engine, such as English, Chinese etc… All you will need to do is to select an area, recognize the text and a translation containing that language will be created. You will be able to edit it to add additional translations in other languages.
- Ancient languages such as Ancient Egyptian Hieroglyphic. For these kind of languages the OCR engine might not be that successful, but it will enable you to recognize glyphs in order to group them into words and finally build your translation. Basically this process is structured into 3 parts:
-
- Discover glyphs
- Group glyphs into words
- Use the found words to create translations
The user will have to use the dialog forms functionality on the right side to apply the above steps. Let’s take a quick look on how the application looks with all forms opened:
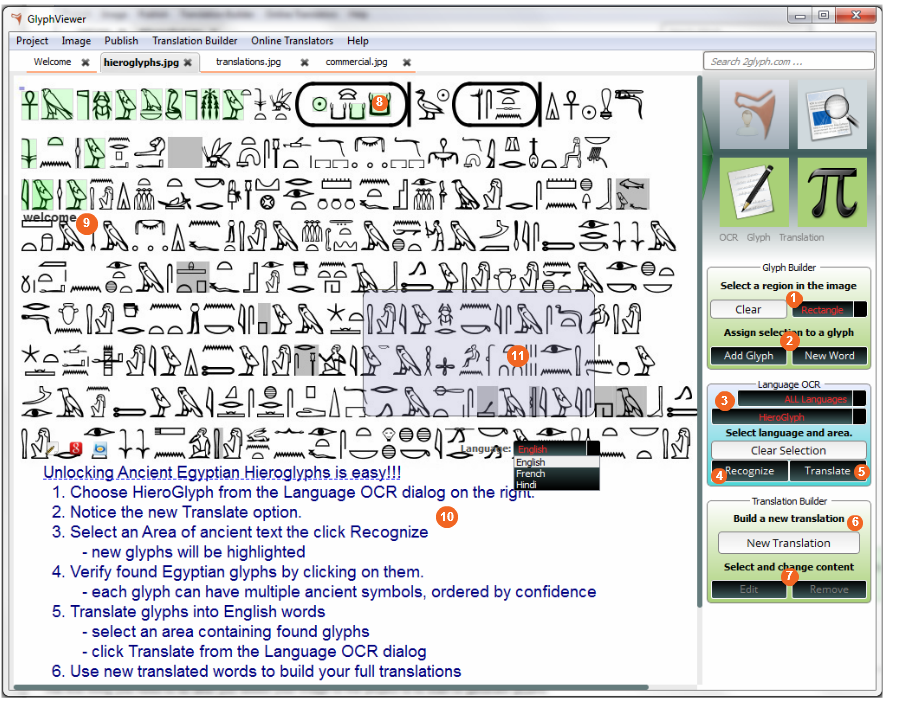
At any time you can filter the items shown on the image by using the Image menu to select/deselect any display option in order to show/hide the elements such as glyphs, words or translations. Hiding them will not cause them to be deleted, you can show them later at any time by clicking on their menu option.
Recognizing glyphs
The first thing you need to do after you added your image to the project is to start to generate glyphs.
Glyphs are basically characters that form a language. For a Latin language they would be letters, numbers. For Ancient languages, such as HieroGlyphs, they are signs in the image such as a bird, hand and so on.
In GlyphViewer application glyphs are identified by an area in the image (rectangular, polygon), and they can have one or more symbols, associated from different languages with a degree of confidence.
A glyph may have more than one symbol because you may not be sure of which one is correct (for example for incomplete or unreadable glyphs in ancient scrolls).
You have the ability to either manually identify glyphs or use an OCR (optical character recognition) method to allow GlyphViewer to identify them for you.
OCR accuracy greatly depends on the image’s resolution and how the character distinguishes from the background image. So if you will be using this method always check your results.
The easiest way to start building glyphs in your image is to use the Identify Ancient Hieroglyphs option from the Translation Builder menu, or use the buttons on the upper right side. You will need to open 2 dialog forms on the right as seen in the image:
- Language dialog will allow you to automatically recognize glyphs using an OCR technology. All you need to do is select a language you believe the glyphs belong to in 3 then click on the Select Area button. To select the region to recognize glyphs, after clicking the Select button drag a rectangular area in your image, the same way you would do to select a region in a paint editor. The region will appear like the one at 11. You can resize it by selecting the borders of the area or move it by dragging it with your mouse across the image. Once you have selected the area containing the glyphs, select the language you believe the glyphs belong to, also from 3, then click Recognize at 4. If glyphs are identified they will appear on your image with surrounded by a bounding box filled with a color based on the confidence level of the identified symbols. If you chose a modern language, such as English, an English translation text will be automatically build and you will be able to edit it.
- Glyph Builder dialog will allow you to manually identify a glyph in the image. You will probably want to use it if OCR fails. First at 1 select from the combo box the area to use to create a bounding area around your glyph. You can use either a rectangular area, Rectangle, or define a polygon using Polygon. After you have chosen the preferred select mode click on the Start Select button also at 1. Then go to the image where the glyph is located and:
- if you chose Rectangle just click on the image then while holding the left mouse button drag to see the corresponding rectangular are forming. When you are done release the mouse left button.
- if you chose Polygon you will have to click on the image with your mouse to add points to your polygon. You will notice that when you move your mouse that the polygon is being drawn, left click to add a point to it. When you are done double click with your left mouse button to commit the polygon.
When you finished creating a bounding area around your glyph click on the Add Glyph button at 2. This will add the glyph to the image, but it will not add any symbols for your glyph. You will notice that the glyph is drawn with a gray area because of this. You will have to manually add symbols to your glyph by editing the glyph area.
Depending on the confidence value of a symbol associated with a glyph, GlyphViewer will use different colors for drawing the bounding box in the image view. As you can see in 8 the glyph has a high confidence value and is shown in green. Near it you can see a glyph with a low confidence value in a gray bounding box. At any time you can remove a glyph and all it’s symbols by clicking on its bounding box as in 8 the clicking on the Remove button in 2. You can also edit the glyph’s value by clicking on it’s bounding box. More information about this can be found in Glyph View section.
Discovering words
After discovering some glyphs in the image, either manual or through an OCR engine, and associated some symbols to those glyphs, it’s time to start to convert them into words. More information about this can be found at 1. Becoming a glypher.
In any case now it’s time to see if we can add some meaning to the found glyphs. This stage can be done through the Language dialog . This step only requires you to to click on the Select Area button at 3 then use the area like the one at 11 to cover over the glyphs that you want to be translated into words.
The selected glyphs are streamed into an array of symbols with their confidence data and sent to a remote 2glyph server to be translated. Only the symbol data is required by the remote server, no part of the original image is ever sent.
In the case that the symbols that you assigned to the glyphs can compose a word for the language you sent you will notice that new data will appear on your image, as you can see in 9. If you move your mouse over the word text you will notice that it will be highlighted as well as the symbols that compose the word. Editing the word can be done by clicking on it in the image, and a dialog form for it will appear as described in Word View section below.
Creating translations
The final step is to actually build your desired translations. At this point this is done manually by adding the translated words to your own translation. We believe that for an ancient language, such as Egyptian Hieroglyphs, any automatic translation will not be possible as composing such a translation should be an art left to the user. But GlyphViewer helps you by providing a list of words that you can use to build your translation. All that you need to do is click on the New Translation… button in 6 and a dialog form will appear to help you with this as described in Translation View section.
After you are done you can see the translation appear on the image with the font and color you have chosen. You can also move it by clicking on the translation and dragging it across the image. You can also select the translation and click Edit in 7 to add different a translation in a different language or modifying one of it or Remove to delete it.
Clicking on the translation, as seen in 10 will cause a combo box to appear on the upper right corner of the translation as well as the translation to be surrounded by a thin border. You can use it to scroll through the different languages it has been translated to.
You can also link or add recognized words to the translation. When you move your mouse over the translation you will see the words and their underlying glyphs becoming highlighted.
A translation can be deleted once you selected it by clicking the Delete key.
Glyph View
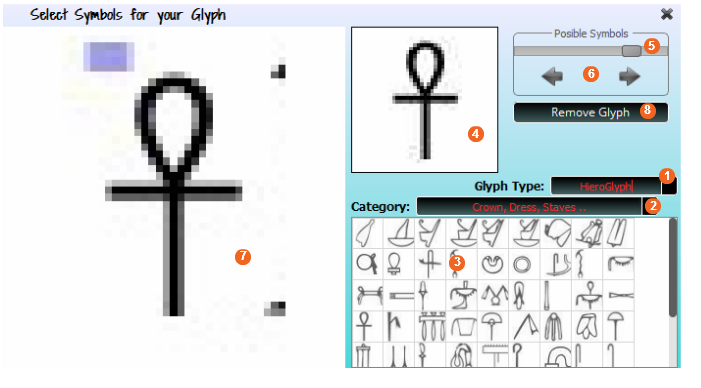
As previously discussed glyphs are regions (rectangular or polygonal) on you image that represent one or more symbols in one or more languages. After the glyph are has been identified, click on any glyph in the image to edit it. The following dialog will be shown over the image:
1. Language
From the combo box you can chose the language you believe the glyph in image 7 belongs to. Changing the language will also update the category menu 2 and the symbol table 3. You can assign symbols from multiple languages to a glyph, but when you will send them to be translated the glyphs will be grouped by languages.
2. Category
Use this combo to filter the symbols shown in table 3. Because some languages have many symbols they have been grouped into categories. Select a category that you think the glyph in image 7 belongs to.
3. Symbols
Table 3 will show the symbols for the language in 1 and for the selected category 2. All that you need to do is click on a symbol and it will be shown in 4. Then you can modify it’s confidence value to add it to the list of symbols that belong to the glyph.
4. Symbol View
When you select a symbol from table 3 or when you iterate through the glyph’s symbols by using the arrows at 6 that symbol will appear in box 4. The image here is that of the symbols as it is represented under a specific font for the language.
5. Confidence
Each symbol assigned to the glyph has a confidence value between 0 and 100. The confidence represents how much you think the glyph is that symbol. It is especially useful for glyphs that may be erased to a certain extent.
To add a new symbol to the glyph just select that symbol and modify it’s confidence value. To remove a symbol from the glyph modify it’s confidence value to be 0. You will notice that the glyphs color in the image will change according to the confidence level of the symbols assigned to your glyph.
6. Glyph’s symbols
Use the arrows here to quickly move through the symbols assigned to the glyph. You will notice that image symbol, confidence, language, category an symbol table will be updated according to the symbol.
7. Original image
Picture 7 represents the bounding box of the glyph from the original image resized a bit. It is useful so you can check that the corresponding matched symbol is correct.
8. Deleting a glyph
All you need to do is to press the Remove Glyph button and your glyph will be erased from the image.
When removing a glyph, that glyph instance will be removed from any word that it was currently assigned to.
Word View
Recognizing words from glyphs is a paid feature of GlyphViewer application. After a word has been identified it will be shown in your image. You can see the translated result easily on the image or you can click on it and the following dialog will appear:

1. Language
A word is a list of glyphs translated into one or more languages. You can use this combo box to see the word’s meaning into different languages. The meaning should be the same across all languages. If a word does not have a translation in a language, the language will not appear in 1.
2. Meaning
The text box will display the meaning of the word based on the selected language.
3. Confidence
The scoll bar will represent the computed confidence of the word. The word is composed of a list of glyphs. From each glyph a single symbol is selected to represent that glyph. The confidence of the word will be the average of all the confidences of the symbols from the glyphs.
4. Symbol list
If this vertical image list the selected symbol from each glyph in the image will be shown. If you move your mouse over the symbol it will be scaled to a larger image and on image view 5 the glyph for that symbol will be slightly highlighted in the image view. You can also remove the symbol from the word by clicking on the cross button at the right top corner of the hovered symbol.
Do not confuse glyphs with symbols. A glyph may be assigned any number of symbols from any language but a word is made up of a list of symbols from only one language. A single symbol is selected from each glyph.
5. Image view
Here you can see the original image with the glyphs that have been selected to compose the word. Hovering over the symbol list in 4 and you will highlight the glyph in the image.
You can add symbols to the word by clicking on a glyph in the image view. The add Symbol button, 8, will be made visible. Clicking on this button will add the symbol with the largest confidence from the glyph to the word. All other symbols of the glyph will be ignored. Remember that a word is composed of symbols, not of glyphs.
6. Removing a word
If you want to remove this word just click on the Delete Word button. It will remove it from the image and from the project.
Deleting a word will remove all meaning of the word into the languages in 1 and will also remove the word from any Translation that is has been added or linked to. If you did not purchase GlyphViewer will also loose the credits you spent for actually recognizing the word.
7. Browse meanings
You can use this next, previous arrow buttons to quickly navigate through the available meanings in different languages assigned to this word. This way you can edit the word more rapidly. To add a meaning in a new language, always use the Language, 1, combo box to select it.
8. Add symbol
You can always use this form to create or edit a word. Once you select a glyph in the image view this button will become visible. Clicking it will add the selected glyph to the word, in the last position. Remember that the symbol with the largest confidence will actually get added to the word, but the glyph in the image will still be linked to this word.
Translation View
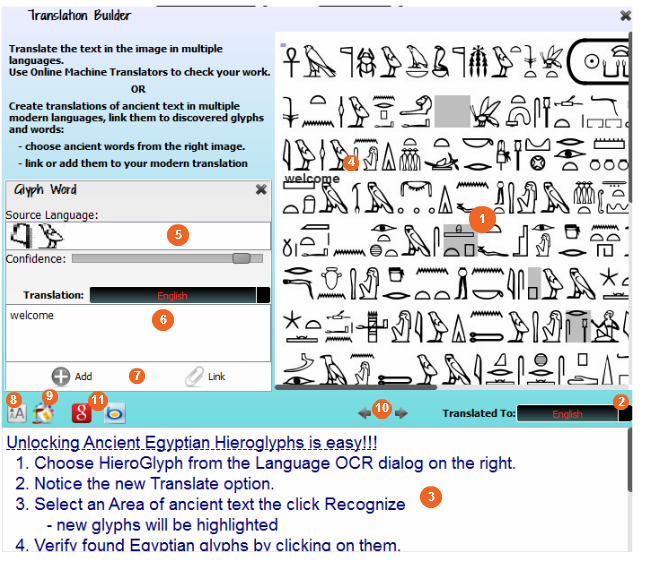
The purpose of GlyphViewer application is to build translations. At any point you can Edit or create a New Translation. The following dialog form will popup:
1. Image view
By default when choosing a translation the original image will be shown as you can see at 1. Here you can see all the glyph words currently identified and translated in the image. You will use them to build your translation. Clicking on a word as in 4 will show the Glyph Word form on the left.
2. Translation language
A translation can be built into different languages. One such usage example is for creating a translation of ancient hieroglyphs and then translating it into different languages. The combo box at 2 allow you to select the current language you are working on and it will be shown as an editable text in 3.
3. Actual translation
In this text box you can edit your translation for a language. The words added or linked to the translation will be shown underlined with a blue strip line as is the case for the welcome word. The layout of the typed text, such as line breaks, will be same as used when the translation will appear in your image tab.
To build a translation you may want to add words that have been recognize. You have 2 methods of adding words to a translation for a language:
- adding a word: select a word from the image such as the Glyph Word form appears. Then with your mouse click on the position in the translation where you want your word to be added. Then click in the Add button in 7 and you will notice that the word has been added.
- linking a word: select a word from the image such as the Glyph Word form appears. Then select with your mouse a typed text in 3. You can then click on Link button in 7 and you will notice that the selected part of the text has been linked to that word. This means that that text actually represents that word (with it’s symbols in the source language).
When you click on a part of text that has the blue strip line you will notice that the Glyph Word form will appear for the corresponding word.
4. Word in image
As discussed you can click on a word that appears in the image to open the Glyph Word form so that you can link or add it to your translation.
5. Glyph Word
The form contains the list of symbols that the word is made up of and also the confidence value of each word. You can also select the language of the word by changing the Translation: combo box. By default the language is set to the language you are currently using, selected in 2.
6. Word data
Here you can see the actual meaning of the word for the language you selected. By default you should use the same meaning of a glyph word in the same language as the translation you are building. For example, if you are building a translation in English you should choose to add or link a word meaning in English,
7. Linking words
We want our translations to have one or more corresponding words associated with them. For example if you identified several words from Ancient Egyptian Hieroglyphs that are close to one another and want to build your own translation, you will want to link them to your translation so that one may see which glyphs in the image were used. As explained in the green tip, you can easily do this by either Add or Link button.
8. Font
You can choose a font for your translation by clicking on the button at 8. Here you will be able to select the font size, as well as if the font should be bold or italic.
For every language you add to your translation you can choose a different color and font settings(size, strength and so on). When you select the language in the translation view that font and color will be used. This is also the same when exporting your data in a HTML format.
If you are going to export your image as a HTML page please make sure to select a font type that is very common to browsers, such as Arial or Times New Roman.
9. Translation color
At the button 9 you can choose a color for your translation text. As you can see the sample provided is blue.
10. Available translations
You may use this buttons to quickly jumped through languages that you already added translations to. This way you can modify very fast any translation you have for the text in the image.
11. Online Translators
One nice feature of GlyphViewer application is that it can copy the text you want to translate to be automatically identified by known machine translators such as Bing or Google Translate. Just select the language you want to translate from, say the text identified in Chinese, and click either the Google or Bing icon. A new web tab will be opened that, after loading has finish, will paste the text to be translated…just wait a few seconds and check the results for yourself. You may copy the translation back to create multilingual translations.